How to Replace Spark Plugs on an Outboard Motor: 8-Step Guide (2026)
If your outboard has started to crank longer, idle rough, or feel a bit flat under load, spark plugs are one of the first things worth sorting. They’re cheap, they’re quick, and when you do them properly, you often get that “why didn’t I do this sooner?” start-up straight away.
This guide walks you through how to replace spark plugs safely and cleanly on most modern outboards, plus what to do if you run into the dreaded snapped plug problem. Once you learn how to replace spark plugs correctly, you’ll save more on the maintenance of spark plugs.
Why Replacing Spark Plugs Is Important For An Outboard Motor
On an outboard, spark plugs live a hard life. You’ve got heat cycles, humidity, salt air, and a lot of low-speed running (trolling, harbour manoeuvring, long idle time) that can load plugs up with carbon. A plug that looks “fine-ish” can still misfire under load, especially when cylinder pressure is higher.
Fresh plugs help your ignition system do its job with less drama: easier starting, steadier idle, cleaner combustion, and often a noticeable improvement in throttle response. If your engine is fuel-injected, plugs still matter because the ECU can only correct so much before weak spark starts showing up as rough running or poor economy.
What Does a Bad Spark Plug That Needs Replacing Look Like?
There isn’t one single “bad plug” look, which is why plug reading is useful. In a perfect world, you pull a plug and it has a clean insulator nose with a light tan or grey-ish colour, and the electrodes aren’t rounded off. In real boating life, you may see an oily spark plug, a corroded one, or other problematic spark plugs.
A heavily carbon-fouled plug (dry, sooty black) often points to lots of idling, rich running, or a plug heat range that doesn’t suit how you use the boat. An oil-wet plug suggests oiling issues (more common on some two-strokes, or engines with internal wear). A white, blistered insulator can indicate overheating or a lean condition — that’s a “don’t just slap new plugs in and ignore it” moment. Spotting these symptoms lays the foundation for learning how to replace spark plugs.
Tips: When you’re learning how to replace spark plugs, take photos of each plug as you remove it, because the pattern across cylinders can tell you more than a single plug ever will.
Symptom you notice
What it often feels like
What the plug commonly shows
What you do next
Hard starting
Cranks longer than normal
Worn electrodes or carbon build-up
Replace plugs, confirm correct type and gap
Rough idle / misfire
Uneven “chug” at idle
Fouling, cracked insulator, or weak spark marks
Replace plugs; check leads/coils and water intrusion
Fuel economy drop
More fuel for the same trip
Incomplete burn (dark deposits)
Replace plugs; review idle time and fuel quality
Loss of power under load
Struggles to get on plane
Worn electrode edges; sometimes glazing
Replace plugs; confirm cooling and correct plug heat range
Source note: Plug inspection and electrode wear checks are described in many manufacturer manuals; Honda’s outboard owner’s manual includes inspection and gapping guidance as part of spark plug service.
Tools and Materials Needed for Replacing Spark Plugs
You can replace plugs with a bare-minimum kit, but the difference between a tidy job and a frustrating one is usually one or two small tools. A torque wrench matters because a rushed replace spark plug job is where aluminium threads get damaged. Don’t drop debris into the cylinder, don’t cross-thread aluminium, and don’t over-tighten.
Tool / material
Why you need it
What to look for
Quick tip
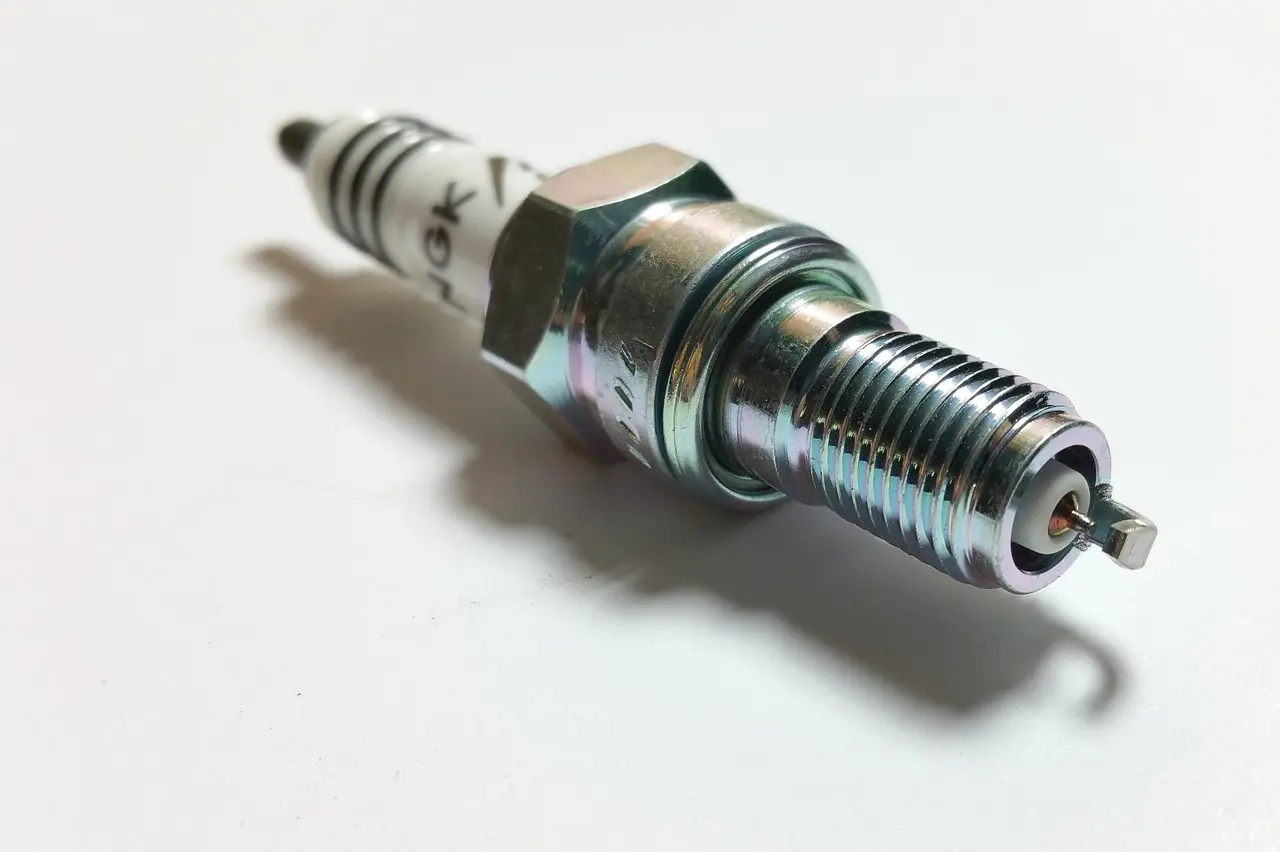
Spark plug socket (usually 5/8″ or 13/16″)
Removes and installs plugs without cracking insulators
Rubber insert or magnetic hold
Use a short extension to keep the socket straight
Torque wrench (or turning-angle method)
Prevents stripped threads or plug breakage
Small-range wrench suitable for plug torque
Aluminium heads are unforgiving of “feel”
Wire-type feeler gauge / gap gauge
Checks electrode gap
Wire gauge is more accurate than flat blades
Always confirm spec for your exact engine
Compressed air or a soft brush
Clears grit around plug wells
Small nozzle helps
Blow debris away before you loosen anything
Dielectric grease
Helps seal plug boots from moisture
Marine-safe dielectric grease
Use a tiny smear inside the boot, not on threads
New spark plugs (correct part number)
Correct heat range and reach prevents damage
Match the engine manual exactly
Don’t “close enough” a plug on an outboard
Source note: NGK’s installation guidance explains using proper tightening method (torque/turning angle) and avoiding damage from incorrect tightening.
8 Steps to Replace Spark Plugs
These steps fit most outboards (two-stroke and four-stroke), whether you’ve got traditional plug leads or a coil-on-plug design. If something in your engine layout looks different, follow your manual’s order of disassembly — but keep the same principles: clean first, remove carefully, and install with correct torque.
1. Step 1: Turn Off Engine and Disconnect Battery
Kill the engine properly, pull the safety lanyard, and let the engine cool. Hot aluminium threads plus a steel plug is how you end up with a plug that feels “stuck” and then snaps. If your boat has a battery switch, turn it off. If you can’t isolate power easily, disconnect the negative battery terminal so you’re not working around a live ignition system.
Let the engine cool. Take ten seconds to ventilate the area if you’ve been running: you don’t want fuel vapour hanging around while you’re leaning in with tools.
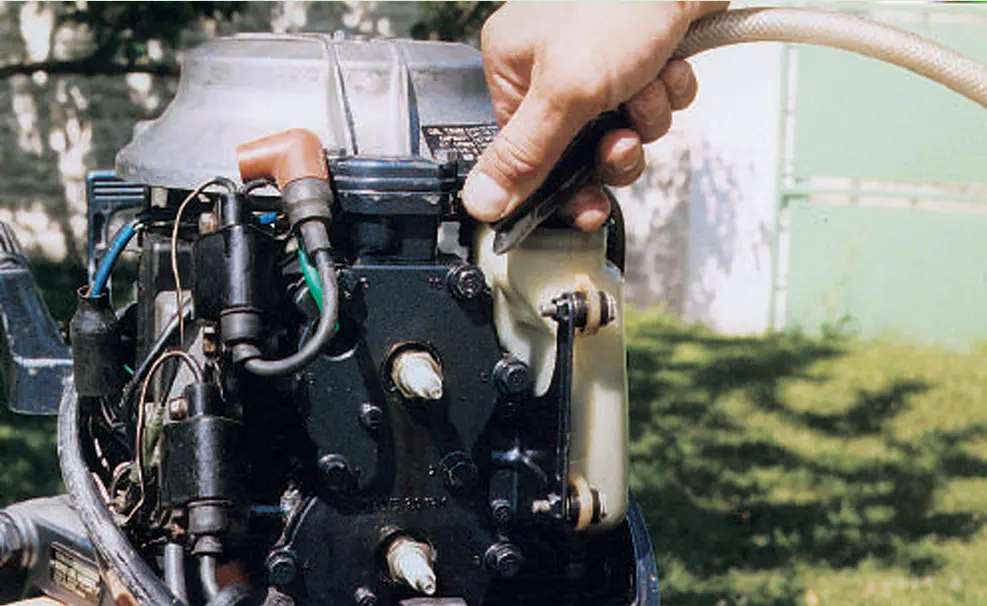
2. Step 2: Locate Spark Plugs
Remove the cowling and locate the plugs. On many outboards they’re easy to spot: thick leads or boots running to the cylinder head. Some engines hide plugs deeper in plug wells, especially multi-cylinder four-strokes.
Before you pull anything, label the leads if there’s any chance you’ll mix them up. On a coil pack or lead set-up, swapping leads can cause misfire or a no-start. On coil-on-plug, the easiest way to avoid mixing parts is to replace spark plug units one cylinder at a time.
3. Step 3: Remove Old Spark Plug
This is the stage where how to replace spark plugs goes wrong most often, so keep the socket straight and apply steady pressure.Use compressed air or a soft brush to clear sand, salt crystals, and grit from around the plug base. If debris falls into the cylinder, it can score the walls.
Disconnect the spark plug leads by pulling on the insulator cap and twisting slightly. Pull the plug boot by gripping the boot itself, not yanking the wire. Unscrew the spark plug with a 16 or 21mm socket, making sure that you keep the axis aligned. If it feels unusually tight, stop, tighten it slightly, and loosen again — the small back-and-forth can help break deposits without ripping threads out of the head.
If you’re thinking about adding anti-seize “because it’s a boat”, pause. Many modern plugs have plated threads designed to install dry, and some manufacturers warn that anti-seize changes torque and increases the risk of over-tightening and thread damage.
If the plug breaks: don’t panic, and don’t start drilling immediately. A snapped plug is annoying, but you can often recover it cleanly if you slow down and keep everything aligned.
How to remove a broken spark plug in a sensible DIY way usually looks like this: make sure the engine is stone cold, blow the plug well clean, apply a small amount of penetrating oil to the threads (not into the cylinder), and let it soak. Then use a proper broken-plug extractor designed for spark plug shells, keeping the tool perfectly centred. If you feel the extractor camming sideways, stop and reset — that’s how aluminium threads get wrecked.
How to get a broken spark plug out without turning it into a head-off job is mainly about patience and alignment. If the shell won’t move with reasonable force, that’s your cue to step back and involve a professional rather than snapping an extractor in the plug (which is a much worse day).
4. Step 4: Inspect Spark Plug Condition
Now look at what you pulled out. Check the insulator for cracks, chips, or tracking lines. Look at the electrodes: if they’re rounded, pitted, or uneven, the plug is tired. If you see heavy carbon, think about how you use the engine. If you see white deposits or a blistered look, consider cooling, fuel quality, and whether the engine has been running lean. If the wear on the electrode is severe or if the carbon deposits are excessive, the spark plug(s) must be replaced.
This is also your moment to compare plug-to-plug. If one cylinder’s plug looks completely different from the others, that’s useful information. Plugs can tell you if one cylinder is running hotter, richer, or wetter than the rest — and that can point you towards issues worth addressing before they become expensive.
Reading the old plug regularly helps you decide whether this is a straightforward replace spark plug service or a sign of a deeper issue. As a general rule, it is recommended that the spark plugs be replaced every 200 hours. But a clean-up can get you by, or prolong its life.
Replace plugs; monitor oil use and smoke; consider compression check
Light tan/grey, clean insulator
Normal combustion
Healthy burn
Use as your “good” reference for other cylinders
Chalky white / blistered
Overheat/lean tendency
Cooling issue, air leak, incorrect plug heat range
Replace plugs; investigate cooling/fuel before hard running
Source note: Spark plug inspection and wear criteria are described in manufacturer maintenance guidance; for example, Honda’s outboard manual shows inspection and replacement if electrodes are worn or the insulator is damaged.
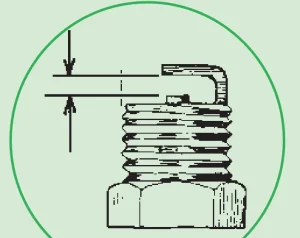
5. Step 5: Adjust Electrode Gap
Adjust the electrode gap by bending the ground electrode very gently, and avoid putting any pressure on the centre electrode or the porcelain insulator. Use the correct feeler gauge to check the gap, and keep adjusting in tiny moves until the gauge slides through with a light, even drag. Your outboard’s manual is the only reliable place to confirm the exact specification for your engine.
As a rough rule of thumb, many electronic ignition set-ups run around 1.0 mm, while some older points-equipped systems are closer to 0.7 mm, but don’t treat those numbers as universal. If you want how to replace spark plugs to actually fix rough running, the gap has to match your engine’s spec, not whatever “usually works” on a different model.
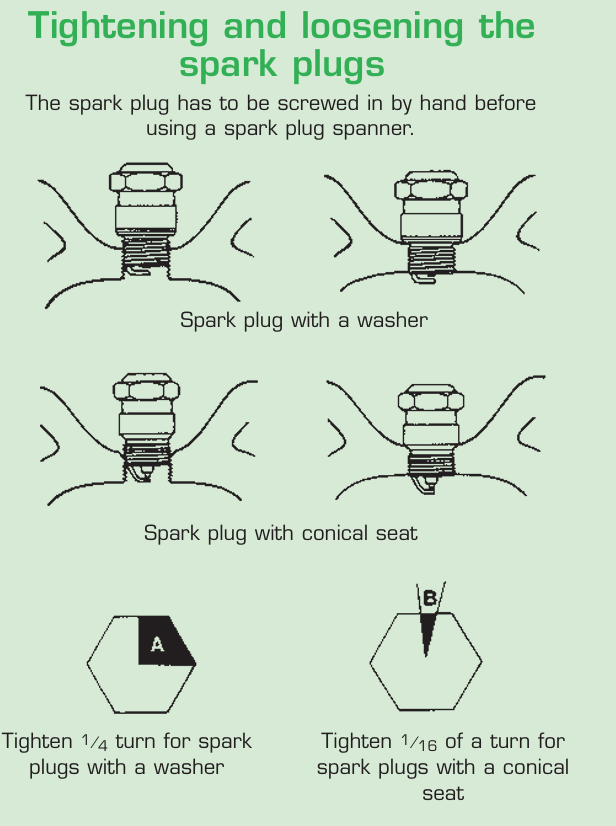
6. Step 6: Install New Spark Plugs
Start every plug by hand. This is non-negotiable on aluminium heads. If you can’t thread it in smoothly by hand for several turns, back it out and try again. Cross-threading a cylinder head is far more expensive than taking 30 seconds to reset your angle.
Once finger-tight, tighten using either the torque spec in your manual or a turning-angle method recommended by the plug manufacturer. For example, tightening finger-tight until the gasket seats, then an additional fraction of a turn depending on seat type).
Reinstall plug boots or coils firmly until you feel them seat. A loose boot can allow moisture in and cause intermittent misfire that drives you mad because it comes and goes.
7. Step 7: Test Engine Performance
Refit the cowling loosely (or keep it off if your model allows safe running without it), reconnect the battery, and start the engine on flush muffs or in a proper test tank. Listen for a clean idle. You want stable RPM, no coughing, and no obvious misfire.
If the engine starts but runs rough, stop and re-check that every boot/coil connector is properly seated, and that nothing got swapped. If you’ve got a multi-cylinder outboard and one lead is on the wrong plug, it can run terribly or not at all.
After you replace spark plug, you should hear a steadier idle and feel cleaner throttle response.
8. Step 8: Refit Everything and Record the Service
Once you’re happy with the idle and throttle response, refit the cowling correctly, secure latches, and stow tools. Give the area a quick wipe so you’re not leaving salt residue sitting under the cover.
Finally, make a simple note of hours/date and the plug part number you fitted. It’s boring, but future-you will love you for it when troubleshooting or ordering spares before a trip.
How Often To Change Spark Plugs For An Outboard Motor
There isn’t one universal interval because plug life depends on engine design, fuel quality, and how you run the boat. That said, many manufacturers cluster around the same “boat reality” schedule: inspect regularly and replace on a predictable rhythm before plugs become a trip-ruiner.
Yamaha’s owner guidance commonly references changing plugs annually or around every 100 hours (whichever comes first), which fits typical seasonal use and the amount of low-speed operation many boats see.
Mercury maintenance guidance similarly places plug replacement/inspection into the 100-hour/annual maintenance mindset (with specifics depending on model and usage).
If you do lots of trolling, short runs, or operate in damp/salty conditions, you may find plugs foul sooner even if they aren’t “worn out”. In that case, you’re not being precious by changing them early — you’re buying reliability.
Usage pattern
Typical plug check timing
Typical replacement timing
Why it changes
Seasonal cruising (mixed speeds)
Every 100 hours or annually
Annually or as needed
Moderate deposits, normal wear
Heavy trolling / low-speed hours
More frequent checks
Earlier than annual if fouling appears
Carbon builds faster at low temps
Saltwater, high humidity storage
At lay-up and mid-season
When corrosion or poor starts appear
Moisture increases tracking/misfire risk
High-load running (fast cruising)
Annual check
When electrodes round off
Heat cycles accelerate wear
Source note: Example manufacturer guidance for plug timing can be found in Yamaha and Mercury maintenance resources.
Common Mistakes to Avoid when Replacing Spark Plugs
Over-tightening: This is the classic. Too tight can strip aluminium threads or distort the plug shell, and in worst cases it can contribute to breakage during removal later. Using a torque wrench or a proper turning-angle method keeps you out of trouble.
Starting with a wrench instead of your fingers: Cross-threading happens fast and feels horrible. If a plug doesn’t go in easily by hand, stop. Realign. Try again.
Not cleaning around the plug before removal: Grit falls into the cylinder, and you’ve just created a problem you didn’t have. A quick blast of air or brush work is cheap insurance.
Mixing plug leads or coil connectors: Misfire, rough running, or no-start. If you’re not 100% confident, swap one plug at a time so nothing gets mixed.
Using anti-seize without understanding the trade-off: Some techs still use it out of habit, but manufacturers like NGK warn that anti-seize can change friction and torque, increasing the risk of over-tightening and thread damage. If your engine manual specifically instructs a lubricant, follow the manual; otherwise, don’t assume you need it.
Ignoring what the old plugs are telling you: If one cylinder’s plug is wildly different, new plugs might mask a deeper issue for a short time. Use the change as a quick health check: fuel quality, cooling, oiling, and whether the engine is spending its life idling.
Going full-send on broken plug extraction: If you do snap a plug, the worst move is rushing. The best move is calm, centred tooling and knowing when to stop. If you’re unsure, get help before you damage threads and turn a simple extraction into a cylinder head repair.
The whole point of how to replace spark plugs is reliability, so take your time: clean the area, keep the socket straight, hand-thread the plug, and tighten to spec.
Conclusion
Replacing plugs on an outboard is one of the simplest jobs that can genuinely change how your engine starts and runs. Do it cleanly, tighten correctly, and treat the aluminium threads with respect, and you’ll get reliable ignition without the “mystery misfire” headaches.
And if you ever end up dealing with a snapped plug, remember this: patience and the right extractor beat brute force every time. If it stops feeling controlled, that’s your sign to hand it over before you cause expensive damage.
Frequently Asked Questions
Can I replace spark plugs myself on an outboard motor?
Yes, most owners can, as long as you follow the manual for the correct plug part number, gap, and tightening method. The key DIY risks are cross-threading aluminium and over-tightening. If you can work slowly, keep things clean, and start plugs by hand, it’s a very achievable job.
How tight should spark plugs be?
Ideally, tighten to the torque spec in your engine manual. If you don’t have a torque spec, use a reputable turning-angle method from the plug manufacturer (finger-tight until seated, then an additional measured fraction of a turn depending on seat type). This prevents both loose plugs (blow-by and overheating at the seat) and over-tight plugs (thread damage and difficult removal later).
Do spark plug wires need replacement every time?
No. Plug leads and boots are typically replaced when they show cracking, corrosion at terminals, stiffness that prevents a proper seal, or when you’re chasing an intermittent misfire that plugs alone didn’t fix. If your boots seal well and the wire insulation is intact, you usually keep them.
What happens if wires are installed incorrectly?
On engines with plug leads, incorrect lead order can cause misfiring, backfiring, poor power, or a complete no-start because the spark is arriving at the wrong time. Even on some coil or harness layouts, a loose or mis-seated connector can create a cylinder that drops in and out. The safest habit is doing one plug at a time, so you can’t mix anything.
What should I do if a spark plug breaks while I’m removing it?
Stop and reassess before drilling or forcing anything. Clean the area, let the engine cool fully if it isn’t already, apply penetrating oil carefully, and use a proper broken plug extractor that stays centred. If the extractor starts to twist off-centre or the plug shell won’t move with controlled force, it’s usually smarter (and cheaper) to get a professional involved rather than risking damaged aluminium threads.


")