Clean Aluminum Boat Like a Pro: 6 Steps for a Shiny Finish (2026)
If your aluminium boat looks dull, chalky, or patchy after a season on the water, you should be alert. Oxidation and grime build fast, and the wrong cleaner can make things worse. This guide shows you how to clean an aluminum boat properly, so you can get a genuinely shiny finish without scratching, streaking, or stripping coatings you meant to keep.
A smart clean aluminum boat routine helps you spot problems early, slows corrosion, and keeps the hull easier to rinse next time. Let’s get into it.
Why Proper Aluminum Boat Cleaning Matters
Aluminium forms a thin oxide layer that protects the metal, yet that same layer can turn powdery and uneven when it’s attacked by salt, grime, polluted freshwater, harsh detergents, or dissimilar metals (galvanic corrosion). The result is usually a mix of dull grey film, white crusty patches, and sometimes tiny pits you only notice once the boat is dry.
A proper routine to clean aluminum on a boat does three practical things:
(1) it removes contaminants that accelerate corrosion,
(2) it restores a more even surface so water sheets off instead of clinging, and
(3) it gives you a chance to catch small issues (loose fittings, failing sealant, stray electrical bonding problems) before they become expensive.
| What you see on the hull | What it usually is | Why it matters | Best first move |
|---|---|---|---|
| Chalky grey film on bare metal | Surface oxidation | Makes rinsing harder; can trap grime and moisture | Start with mild wash, then use an aluminium-safe brightener only where needed |
| White crust near fittings or waterline | Oxide/corrosion products | Can indicate crevice corrosion or trapped salts | Thorough rinse, targeted cleaner, then inspect fasteners and sealant |
| Dark streaks running down the side | Run-off staining (often mixed grime/oils) | Usually cosmetic, but can hide poor drainage | Degrease gently first; avoid aggressive pads that scratch |
| Spots that look “peppered” (tiny pits) | Pitting (often corrosion-related) | Can deepen over time if not stopped | Clean, dry, and assess; don’t just polish over it |
Cleaning chemistry and surface-compatibility guidance varies by product; always follow labels and safety data sheets. General cautions about harsh acids/alkalis on aluminium are widely noted in marine maintenance guidance.
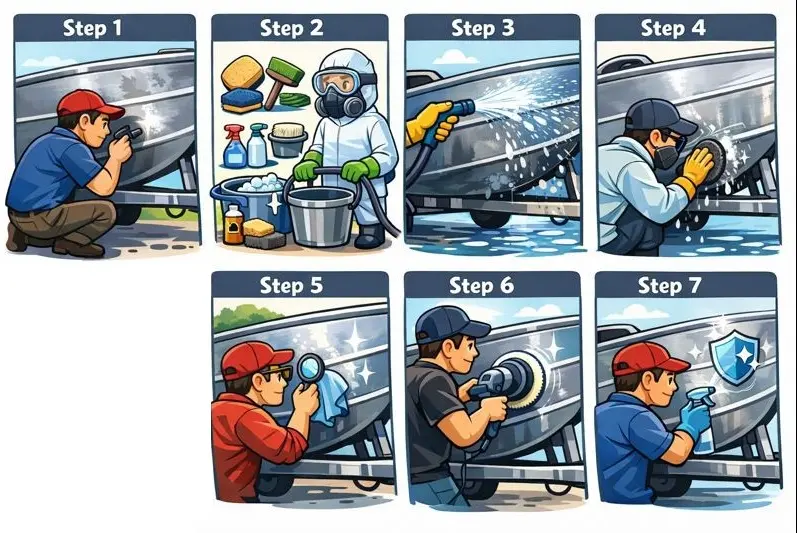
Step 1: Inspect and Prepare to Clean Aluminum Boat
1. Inspect Boat Hull for Damage, Corrosion, or Leaks
Before you touch a hose, do a quick walk-around. You’re looking for problems that cleaning might hide (or aggravate) if you blast straight over them. This is especially important if you plan to clean aluminum boat hull with any kind of brightener, because some products work by controlled etching — effective, but not something you want near failed sealant or exposed electrical connections.
Use this simple checklist:
- Seams, welds, and rivet lines: look for hairline cracks, lifting sealant, or white corrosion tracks.
- Transom area: check around mounts and bolts for white bloom, staining, or weeping water after the last trip.
- Trailer contact points: bunks and rollers can create abrasion marks that trap grime and start crevice corrosion.
- Fittings and accessories: anything stainless bolted to aluminium is a potential corrosion hotspot if sealant fails.
- Coated areas: if you have paint, anodising, or a clear coat aluminum boat finish, note flaking or cloudy patches — that changes what you should use later.
Finally, pick a sensible workspace: shaded if possible, with plenty of water available. Cleaning an aluminium hull in direct sun can dry cleaners too fast, leading to streaks and uneven results.
Step 2: Initial Cleaning and Pre-Rinse to Clean Aluminum Boat
Do the “safe wash” first (before anything acidic)
If you only remember one rule: don’t start aggressively. The best way to get a pro finish is to remove loose dirt and oils first, so you’re not grinding grit into the metal or forcing chemical cleaners to fight through grease. For many boats, this mild stage is already “enough” to keep the hull tidy between deeper restores. And it’s the lowest-risk method for anyone learning how to clean aluminum on a boat.
Start by wetting the hull from bottom to top (yes, bottom first). On vertical surfaces, this helps reduce streaks because the surface stays evenly wet.
Recommended Cleaners for Aluminum Boats
For the initial wash, stick to a pH-neutral boat shampoo or a mild detergent designed for aluminium-safe use. Neutral aqueous cleaners are commonly described as operating around pH 6–9, which is a safer zone for aluminium compatibility than strong acids or caustic alkalis.
Save acid-based cleaners for the next stages and only where oxidation actually needs it. If your boat is anodised or has coated aluminium components, be extra cautious: guidance for anodised aluminium often warns against both acidic and alkaline cleaners, and against abrasive materials that can damage the finish.
Gather Acid-Resistant Gloves, Eye Protection, and Protective Clothing
If you’re planning to use any brightener or oxidation remover, remember to wear PPE such as protective gloves, aprons, and eye protection.
- Gloves: chemical-resistant (often nitrile or neoprene; check the product guidance).
- Eye protection: sealed goggles for splash risk.
- Clothing: long sleeves and trousers; add a chemical-resistant apron if you’re spraying.
- Ventilation: outdoors is ideal; avoid enclosed sheds.
Brushes, Sponges, and Safety Gear to Clean Aluminum Boat
Your tools matter as much as your chemicals. Aluminium scratches easily, and scratches become “dirt anchors” that make future cleaning harder. For the wash stage, use:
- Soft wash mitt, microfibre sponge, or sponge roller for broad surfaces.
- Soft-bristle brush for non-skid decks and textured areas (avoid stiff nylon that scours).
- Detail brush for around fittings, welds, and tight corners.
- Separate bucket/tools for greasy areas (outboard splashwell, scuppers), so you don’t smear oils over clean aluminium.
Step 3: Rinse and Remove Loose Debris to Clean Aluminum Boat
Now do a thorough rinse to remove loose grit.
Work top-down for the heavy rinse. Focus on:
- Spray rails, chines, and strakes: grit collects here and drags when you wipe.
- Behind steps and ladders: trapped silt loves these corners.
- Transom splash zones: oily film from exhaust/water mix can spread.
Once the hull is fully wet and grit-free, do the mild wash: shampoo in a bucket, a gentle wipe, then rinse again. At this point your aluminium should look “clean”, even if it’s still dull. That’s fine — dullness is usually oxidation, and that’s next.
Step 4: Apply Cleaner and Remove Oxidation to Clean Aluminum Boat
This is where a clean aluminum boat becomes a shiny one — but it’s also where people create blotches. The trick is to work in small, repeatable sections: think 0.5–1 m² at a time, depending on temperature and how fast products dry.
Before you start, decide what you’re cleaning:
- Bare aluminium hull: you can usually use a dedicated aluminium cleaner/brightener where oxidation exists.
- Painted or clear-coated aluminium: treat as a coated surface first; follow coating-safe products and test discreetly.
- Anodised parts: avoid harsh acids/alkalis and abrasives that damage the anodised layer.
Apply Acid-Based Cleaner
Many oxidation removers for marine aluminium are acid-based and described as removing oxidation by controlled etching, which helps restore a bright, even finish when used correctly. The key word is controlled.
Techniques for Stubborn Stains and Discoloration
If you’ve got stains that survive the wash-and-brighten pass, don’t immediately reach for harsher chemicals. Instead, identify the stain type:
- Organic staining (algae/tannin): usually responds to dedicated hull cleaners and gentle brushing.
- Rust marks from trailers/fasteners: often need a targeted spot treatment (follow product guidance; rinse well).
- Fuel/oil film: degrease first; oxidation removers don’t cut grease efficiently, and can spread it.
Here’s a pro move that avoids chasing your tail: after rinsing, dry a small test patch with a microfibre cloth. If the mark “disappears” when wet but returns as it dries, you’re looking at oxidation patterning rather than a true stain — focus on evening out the oxidation removal step, not on spot-attacking it forever.
Tips for Avoiding Scratches and Damage
Want a shortcut to ruining your finish? Grab a harsh pad. If your goal is how to clean and polish aluminum boat surfaces to a shine, your safest approach is always “soft tools, more time”.
- Avoid steel wool on bare hull panels: it can leave fine scratches and embed particles in odd places.
- Don’t sand unless you’re repairing: sanding changes the surface pattern and can make panels look patchy under polish.
- Keep brushes clean: one bit of grit stuck in a brush can carve a line across a panel.
- Rinse tools constantly: especially when working near the waterline where grit is thickest.
Also, don’t fall into the “stronger is better” trap. Practical marine guidance notes that acids can damage aluminium components if misused, and alkalis can be highly damaging too — to you and to parts of the boat.
Step 5: Rinse and Deep Surface Check After You Clean Aluminum Boat
After any oxidation removal step, rinsing is not optional. You’re not just washing off cleaner — you’re stopping the reaction and preventing streaking. Rinse from top to bottom, then rinse again across seams and fittings where liquids hide.
Now do a “deep check”:
- Look at the hull from an angle: patchiness shows as bands or clouds.
- Run your hand across the surface (gloved): roughness often means oxidation remains or the cleaner dried.
- Inspect around stainless fittings: white bloom returning quickly can indicate trapped salts or a sealant failure.
If you’re seeing streaks, don’t panic. Usually the fix is simple: re-wet the panel, re-apply lightly in a smaller section, and rinse before it flashes dry. The biggest mistake is trying to “rub out” chemical streaks aggressively — that’s how you end up with scratches you can’t unsee.
Step 6: Polish Aluminum for Shine After You Clean Aluminum Boat
Once the oxidation is evened out and the hull is clean, polishing brings depth and reflectivity back.
Some marine polishes are specifically described as removing oxidation and stains and restoring a lustrous appearance to bare aluminium when used sparingly and worked thoroughly.
Recommended Polishing Compounds and Tools
Pick a polish designed for marine aluminium, and match the tool to the size of the job:
- Hand polish: best for small boats, tight corners, and controlled work near decals/trim.
- Dual-action polisher: safer for beginners; less likely to create obvious swirl patterns.
- Rotary polisher: fastest for big areas, but easiest to overwork edges if you’re careless.

Work with multiple clean microfibre cloths. Polishing is basically controlled abrasion: once a cloth loads up with residue, it stops “polishing” and starts smearing.
Circular Motion Technique and Buffing Tips
There are two reliable approaches:
- Small circular passes: good for hand work and tight areas; keep pressure light and consistent.
- Overlapping cross-hatch passes: ideal for machine polishing; overlaps reduce missed strips and visible “edges”.
Buff residue before it cakes. If your polish instructions recommend working small areas and buffing to high lustre with a clean, soft cloth, follow that advice exactly — it’s usually written that way to prevent haze and to keep the polish from drying into stubborn film.
If you want the shine to last, don’t skip the final wipe-down. Once you’re happy, rinse lightly (or wipe with clean water and microfibre) to remove dust. Then let the boat dry fully before any protection step.
Step 7: Apply Protective Coating or Clear Coat After You Clean Aluminum Boat
Here’s the truth: a freshly polished hull looks brilliant, but it’s also more “open” to fingerprints, water spotting, and future oxidation. Protection slows that down. This is also where people start asking about a clear coat aluminum boat finish.
You’ve got three common protection routes, and they’re not equal:
- Wax/sealant: quickest, easiest to refresh, good for most owners.
- Ceramic-style coatings: longer-lasting slickness, but surface prep must be immaculate (any leftover oxidation gets sealed in).
- Clear coat: can look fantastic, but it’s the most unforgiving. If you apply clear over contamination, you lock the problem underneath, and peeling becomes a bigger job than cleaning ever was.
If your boat already has clear coat and it’s failing (cloudy, peeling, flaking), cleaning won’t “fix” that. At that point, you’re in repair territory: remove failing coating properly, correct the surface, then recoat with a system designed for marine exposure.
Read More: Best Aluminum Bay Boats (2026): Top 10 Models for Fishing & Shallow Water
Pro Tips for Ongoing Aluminum Boat Maintenance
Frequent Rinsing After Saltwater Use
Rinse the hull, fittings, and trailer contact points as soon as you can. Salt crystals hide in seams and under hardware, and they keep working even when the boat is sitting still.
A simple habit that helps: keep a soft brush and a small bottle of mild wash in your kit. Ten minutes at the ramp can save hours later.
Avoid Abrasive Materials and Harsh Chemicals
When you’re tempted to “blast it clean”, remember: harsh chemistry can damage aluminium and coatings, and abrasives leave scratches that catch grime. Guidance for anodised aluminium, for example, explicitly warns against abrasive materials like sandpaper and steel wool. :contentReference[oaicite:16]{index=16}
Also be cautious with strong acids and caustic alkalis. Marine guidance highlights that both acids and alkalis can be damaging and that PPE is important when using them. :contentReference[oaicite:17]{index=17}
If you’re unsure whether a product is safe, the simplest rule is: if it’s designed for ovens, drains, or heavy-duty masonry cleaning, keep it away from your hull.
Storage and Cover Recommendations
Storage won’t stop oxidation forever, but it slows it down. If you can, store the boat dry, ventilated, and out of direct sun. A breathable cover reduces water spotting and keeps dirt from baking onto hot aluminium.
If you trailer-store, check that bunks are clean and dry. Wet carpeted bunks can hold saltwater against the hull, encouraging crevice corrosion exactly where you can’t see it.
Conclusion
A shiny hull isn’t about luck — it’s about doing the basics in the right order, then being selective with stronger products. If you rinse thoroughly, wash gently, and treat oxidation in small controlled sections, you’ll get consistent results and avoid the blotchy, scratched look that makes aluminium seem “impossible”.
Keep your routine simple, protect the finish you’ve earned, and your next clean aluminum boat day will feel more like a quick refresh than a full restoration.
Frequently Asked Questions
What is the best cleaner for aluminum boats?
The best cleaner for aluminum boats depends on what you’re removing. For routine dirt, start with a mild, aluminium-safe boat wash (often neutral pH). For chalky dullness (oxidation), use a dedicated aluminium cleaner/brightener designed to remove oxidation — but only where needed, and never let it dry on the surface. Always test a small area first and follow the label.
What’s the best way to clean an aluminum boat?
The best way to clean aluminum boat surfaces is a staged approach: rinse to remove grit, wash gently to remove oils and grime, then treat oxidation in small sections, rinse thoroughly, and finish with polish and protection if you want shine. Doing it in this order prevents scratches and reduces streaking.
How do I make my aluminum boat shine again?
To make it shine again, you typically need two things: remove oxidation evenly (often with a dedicated aluminium cleaner/brightener) and then polish with a marine aluminium restorer/polish. Many products are designed specifically to remove oxidation and restore lustre when worked thoroughly and buffed properly.
How often should I polish my aluminum boat?
Polish as often as your use demands — many owners do a seasonal polish, with quick rinses and mild washes between. If you boat in saltwater, you may need more frequent touch-ups on high-splash areas. If you apply a good protective sealant after polishing, you can usually stretch the interval because the surface stays slicker and easier to rinse.
Is aluminum safe in an ultrasonic cleaner, and what cleaners should not be used on aluminum?
Aluminum in ultrasonic cleaner setups can be safe for small parts if you use aluminium-compatible solutions, higher frequencies, and limited exposure time — low frequencies, harsh chemistry, or long cycles can increase the risk of surface damage. As for what not to use: avoid harsh acids/alkalis on sensitive finishes (especially anodised parts), and avoid highly abrasive methods that scratch. Marine guidance also stresses that both acids and alkalis can be damaging and require proper PPE.
References
Brulin. (2025). Selecting the best cleaning chemistry for aluminum parts. https://www.brulin.com/parts/insights/selecting-best-cleaning-chemistry-aluminum
Crest Ultrasonics. (n.d.). How to safely use an ultrasonic cleaner for aluminum parts. https://crest-ultrasonics.com/using-an-ultrasonic-cleaner-for-aluminum-parts/
Health and Safety Executive. (2025). COSHH basics: Personal protective equipment (PPE). https://www.hse.gov.uk/coshh/basics/ppe.htm
Health and Safety Executive. (2025). COSHH and cleaners: Key messages. https://www.hse.gov.uk/coshh/industry/cleaning.htm
West Marine. (n.d.). West Marine Aluminum Boat Cleaner, 64 oz. https://www.westmarine.com/west-marine-aluminum-boat-cleaner-64oz.-15023815.html
Kaijo Shibuya. (2022). How to safely clean aluminum parts with ultrasonics. https://www.kaijo-shibuya.com/how-to-safely-clean-aluminum-parts-with-ultrasonics/


")